A Homemade
Dragonfly Net
Janet and I started out photographing dragonflies in 2005. We obtained many good photos but realized that we were missing out on identifying a lot of species because they just would not land and let us photograph them. I built our first net in 2008 using an old, fixed length broom handle for a total cost of about $20. It was great and we were finally able to photograph and identify all those critters that never seemed to land. We had seen nets with telescoping handles advertised on the internet and decided to make some, since packing the old, fixed length net into the car was awkward. We had them ready in time for the 2009 odonate season and they worked fabulously. A post to the Ont-Odes group on Google Groups inquiring about telescoping nets prompted us to put together this set of do-it-yourself instructions for building our design.
Although these instructions contain references to specific pieces of hardware, there is no need to use exactly what we have used. Feel free to substitute and experiment. These instructions are only meant as a guide. Enjoy!
A PDF version of this page is available here.
Back to Table of Contents
Disclaimer - Use appropriate safety equipment and follow safe working practices while building the dragonfly net. We assume no liability for any damages or injuries incurred while using these instructions.
There
are four parts to our dragonfly nets:
Handle
Hoop
Plug
Netting
CAUTION - Wear appropriate safety equipment, including eye and hand protection, when working on this project.
Handle
Hoop
Plug
Netting
CAUTION - Wear appropriate safety equipment, including eye and hand protection, when working on this project.
The Handle
We use the telescoping metal handle from a floor duster for our net handles. The handle from the Hero™ floor duster, from Canadian Tire™ (part no. 42-9372-0, $14.99), works well (Photo 1). It collapses from 47.25 down to 26.5 inches. The assembled net is less than 42 inches long when collapsed and fits very nicely in the back seat of a car. At the mop end of the handle, the outside diameter is 0.76 inches and the inside diameter is 0.72 inches.
NOTE: The CTC™ web site does not show this mop with a telescoping handle, although it came with one in January 2010. I have recently seen a different style of telescoping handle at Princess Auto™. It is very reasonably priced (~ $4). I have no way of knowing if it is suitable. The handle diameter will probably be different as well, so you'll have to modify the diameter of the plug to fit into it.
UPDATE: I acquired one of the handles mentioned above from Princess Auto™ and they work quite well. The inside diameter is about 13/16 inches, so 3/4 inch dowelling will not be big enough for the plug. They are about a foot longer than the mop handle we have been using, which I think is a good thing. They were selling for $2.99, which makes them even more appealing.

Photo 1 - The Duster
The action of a telescoping handle should be tested before you buy one. Extend and retract it several times, locking and unlocking it at each extreme. If it fails to lock at either end, and a few will, try a different one.
Remove the mop head from the handle by depressing the button on the plastic end fitting of the handle. The handle end fitting is made of plastic (Photo 2) and can be cut off with a hacksaw (Photo 3).

Photo 2 - Handle with end fitting on the left. Note the pair of dimples on the shaft.

Photo 3 - The hacksaw
CAUTION - Wear eye protection. A hacksaw blade can be quite brittle and if it breaks, sharp metal fragments may fly off.
Clamp the metal part of the handle horizontally in a vise. Try to avoid distorting the cylindrical profile of the handle while doing this. Protect the paint on the handle by placing a piece of thin cardboard, such as the packaging of the duster, between the handle and the jaws of the vise. Cut the end fitting off, about half way between the handle and the release button, using the hacksaw. You might want to protect the handle from accidental slips of the hacksaw with a couple of layers of plastic tape while doing this.
Note that there is a wire spring inside the end fitting which is aligned with the grooves and the button (Photo 4). Rotate the handle in the vise to avoid having to cut through this. Also note that I tried to wiggle the end fitting out of the handle and that the plastic fatigued and broke before this happened. This was a lot of work and failed. The hacksaw method is better.
To get the remnant of the plastic end fitting out of the handle, insert the free end of the hacksaw blade into the handle and cut three or four equally spaced slots through the plastic. Be careful not to cut into the metal handle. I cut two closely spaced slots and it worked but four would have been better. Note the pair of dimples near the end of the metal handle in Photos 2 and 4. There are four pairs of dimples around the circumference of the handle. These serve to hold the end fitting securely in the handle and are also what make it so difficult to remove. You can see how far they protrude inside the handle in Photo 5. Do not cut the slots at these points. Remove segments of plastic by inserting a narrow tipped slot screwdriver into the slots you have cut and prying them loose.
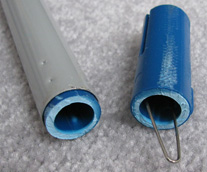
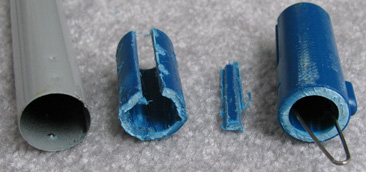
Photo 4 - Partly removed Photo 5 - Completely removed
The dimples make eight protrusions on the inside of the handle which will prevent the plug from being inserted. Use a small, round or half round file to remove most of the height of these protrusions, without breaking through to the outside of the handle. You only need to remove most of a protrusion, not all of it.
Put the handle aside for now and move on to the hoop.
The Hoop
A few words about wire - The hoop is made of galvanized steel fencing wire. The wire we are currently using has a nominal diameter of 0.120 inches, which is a hair's breadth narrower than 1/8th of an inch. The only exact match for this size is 11 BWG. There are several different systems for designating wire sizes, AWG and BWG being two of the common ones. Many hardware store employees won't have a clue which system is used when they look up the wire on the store computer and tell you it is 11 gauge. If it happens to be 11 AWG, then it will only be 0.0907 inches in diameter and not quite stiff enough for a net. Take a set of vernier calipers or a micrometer with you and measure the wire's diameter before you buy it. If you don't have calipers, drill a 1/8th inch diameter hole in a piece of steel, aluminum or even wood and take it to the store. Try to fit the wire through the hole. If it is loose, don't buy it but if it is a close fit or won't quite fit, buy it. Stay away from annealed wire, which is very soft. The wire you need is quite stiff and a bit difficult to work with but it is just right for nets.
While writing this article, I have tried to make sure that the materials I bought several years ago are still available. Home Hardware™ originally sold the wire we use as item # 5421-340 (wire bottom galvanized 100' 11GA) and it measured 0.120 inches in diameter. Four years later, in January 2010, the same item is only 0.109 inches in diameter, which is 12 BWG, although it is still listed as 11 gauge. They currently have no galvanized steel wire with a 0.120 inch diameter. Searching the web for a substitute was frustrating, so I called a local farm supplies company (M&R Feeds™ in Pembroke) and found 9 BWG galvanized steel wire, which has proven to be a perfect substitute. It is slightly larger, at 0.144 inches in diameter, but a little more stiffness isn't a bad thing. The price is also good at $17 for 180 feet (enough for 36 nets)! You may have to look around a bit to find the right wire.
A drawing of the 15 inch diameter hoop, with dimensions, is shown in Figure 1.
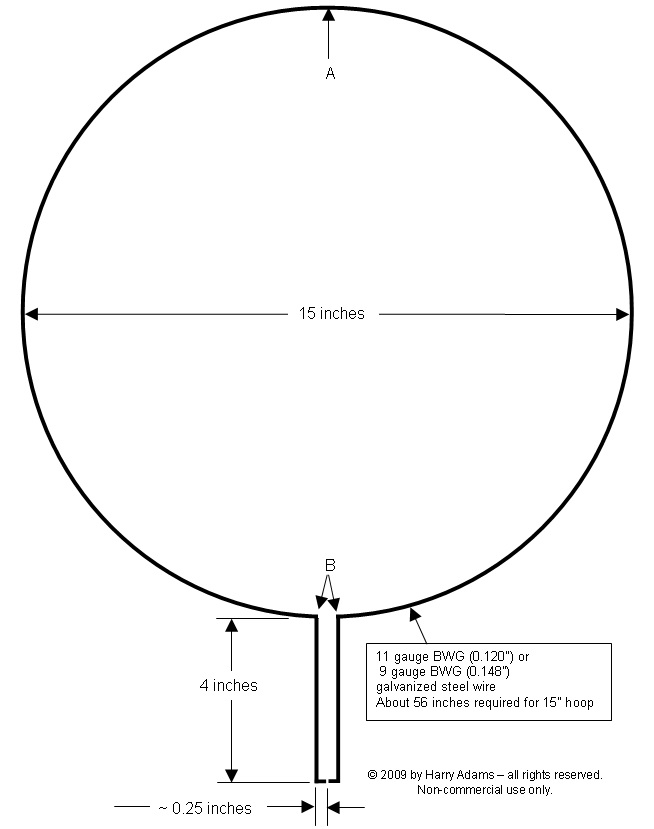
Figure 1 - The Hoop
Forming the hoop - You will need a piece of wire about 4 inches longer than the finished length, so 60 inches for a 15 inch net.
CAUTION - Wear gloves and eye protection when working with the wire. The wire comes in a coil which may, or may not, be under high tension. You will have to carefully release the bindings holding the fence wire in the coiled state and if it is under tension, it will abruptly uncoil as you do this. Use heavy wire cutters and wear gloves and eye protection when you do this, as there may be quite a bit of energy released.
Use a flexible measuring tape and mark a point 60 inches from one end of the coil and cut the wire off with the heavy duty wire cutters or a hacksaw. If you have bolt cutters, they work even better. Use a file to round the sharp edges on the ends of your piece of wire.
The wire, as it comes off the original coil, will probably have some twist in it, which will make it take the shape of a spiral that will not sit flat on a table top. After cutting off the wire, pick up the hoop near one of the ends and allow it to hang vertically from your hand. Look down, from above, along the "plane" of the wire and you will notice where it deviates from a plane. Work your way around the hoop making small bends as you move towards the other end, trying to flatten the spiral. You do not need to straighten the wire out. The natural curve in the wire is halfway to forming the hoop.
Measure the length of the wire again and mark the middle point (A in Figure 1) with a marker. Now measure 1/2 the hoop circumference (47.1 ÷ 2 ≈ 23.6 inches) on both sides of the middle and mark these points (B in Figure 1) as well. These two points are where you will bend the wire to form the arms.
Find a piece of cardboard about 16 by 20 inches and draw a hoop template on it (see Photo 6). A 6 inch ruler is shown for scale. You will measure the angles as you form the hoop and arms using this. The circle has a radius of 7.5 inches and was drawn using a compass made from a piece of scrap lumber and a small nail (shown in top half of circle in Photo 6). Drill a hole near one end (on the left) just large enough so that the tip of a permanent marker can make contact with the cardboard on the other side. Measure 7.5 inches from the centre of this hole and drill another hole a bit smaller than the diameter of the nail. Tap the nail though this hole so that it protrudes about 1/8 inch on the other side. Make a hole with the end of the nail at the cross 8" from the left and 8" from the bottom of the cardboard and draw the circle. Draw a line through the hole you made with the nail to the right hand edge of the cardboard and then draw a line through it 4 inches from where it intersects the circle.

Photo 6 - Hoop Template
The wire is very stiff and the easiest way to bend it is to hold it in the jaws of a vise and use a hammer (see Photo 7).
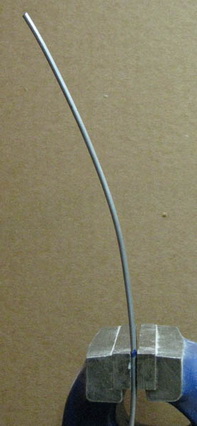
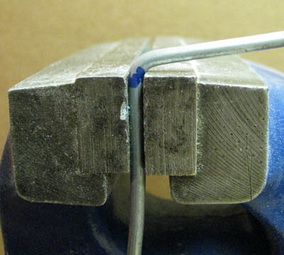
Photo 7 - Gripping the wire. Photo 8 - Bend the wire away from the hoop.
The hoop is on the left and
in the plane of the photo.
Line up one of the pair of marks you made earlier at B (blue mark in Photos 7 and 8) along the top of the jaws so that the short end of the wire extends above the jaws and clamp it. The jaws of the vise should be perpendicular to the plane of the hoop. Gently apply pressure to bend the wire away from the centre of the hoop, keeping it in the plane of the hoop and hammer at the bend nearest the vise until you have almost a right angle (see Photo 8). Better to bend too little than too much. Form the other arm in the same manner.
Now check your angles against the template and make adjustments until you have a pretty good match (see Photo 9). The arms will have to be held together to do this, since the wire of the hoop still has the original curve that it had when it came off the coil of wire. Final adjustments to the shape of the hoop can be made after the hoop, plug and handle have been assembled. At this time, you just want get the angles close.
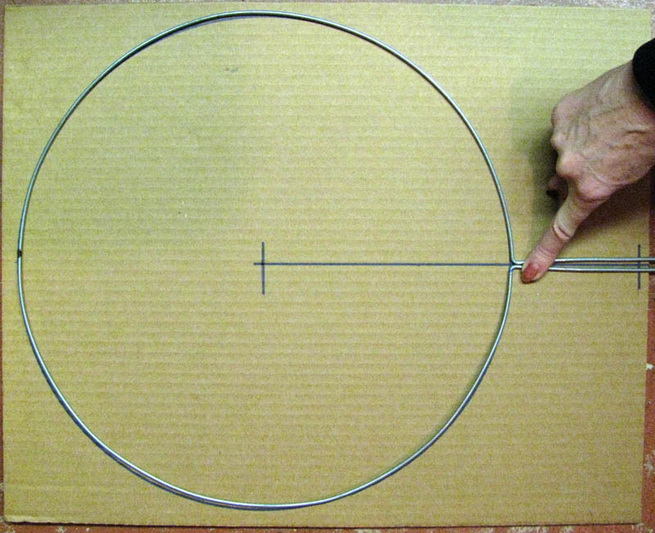
Photo 9 - Angles Check
Put the arms on a flat surface and hammer any small bends out. Photo 9 was taken before this was done and you can see that the arms are a bit kinked just to the right of Janet's finger. The arms need to be straight or they won't lay flat in the V-grooves in the plug.
Now measure 4 inches down each of the two arms of the hoop and draw a line with a marker (see Figure 1). At these lines, use the vise and hammer to bend the two tangs in towards each other at a right angle, in the plane of the hoop. The arms don't have to be exactly 4 inches but they do need to be the same length, so try to make them match when bending the second tang over. Trim the tangs off so that they are 0.25 inches long. Square the ends with a file and bevel the edges slightly. Except for some minor trimming, the hoop is now complete.
The Plug
The plug secures the hoop to the handle and prevents it from sliding out of, or rotating in, the handle. It is made from a 5 inch long piece of 3/4 inch diameter hardwood dowelling. The dowelling is available at hardware stores and at Canadian Tire™ (part no. 054-9084-8, $2.49). The diameter of the dowelling is a little too large to fit in the end of the handle, which has an inside diameter of 0.72 inches, but this can be fixed with a sanding block and about 15 minutes of work. We use 80 grit sandpaper wrapped around a 4 inch long block of 1 x 2 inch wood.
Grip the 5 inch long section of dowelling horizontally in a vise and start sanding. Make 10 to 12 strokes with the sandpaper and rotate the dowelling about 1/8 of a turn and make another 10 to 12 strokes. Repeat this until you have gone completely around the dowelling once. Bevel the ends of the dowelling slightly with the sandpaper and try to fit it into the end of the handle. Try one end of the dowelling and then the other. Unless you have a calibrated wrist, you will probably sand a little more off one end than the other. Continue until half of one end of the dowelling fits snugly into the handle then sand the other half until it fits snugly. Use moderate force when inserting the dowelling and don't insert it all the way. You should be able to move it by gripping it firmly and using a rotating motion. Once you have achieved a snug fit on both halves, you can stop sanding.
The next step is to make two V grooves in the plug to hold the arms of the hoop.
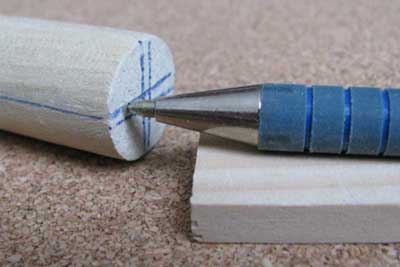
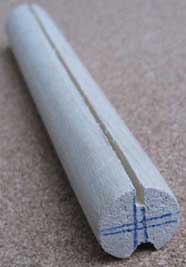
Photo 10 - Finding Centres Photo 11 - The Slot
Now you need to make lines along the length of the plug on opposing sides (see Photo 10). Use something to hold the tip of a pen close to the centre of the end of the plug. We used a thin block of wood but a magazine will work too. Sliding the pen and block together make a line on the end of the plug. Rotate the plug 180° and repeat. If the lines are not quite parallel, don't worry. (You can always rotate the plug 90° and have another try.) Hold the plug side-on to the pen and block. Rotate it so that the space between the two lines on the end is centred on the pen tip. Now, grip the plug firmly so it can't rotate and slide the pen and block along the length of the plug, drawing a line on it. Repeat on the other side of the plug. The lines may not be exactly opposite each other but they are close enough.
A hacksaw will work fine for cutting the slots but a wood saw will work better since it makes a wider cut. Grip the plug horizontally in a vise, with one of the lines facing up. Line up the saw with the line and, as carefully as you can, cut a slot directly along the line you drew (see Photo 11). The slot should only go as deep as the diameter of the wire you are using. Once again, it needs to be close, not perfect. Repeat on the other side.
Next, use a wood chisel to widen the slots out into two V shaped grooves. Wood chisels are supposed to be very sharp, so wear protective gloves and eye protection. Note that in the Photo 11, I have already widened the lower slot into a V shape. Photo 12 shows the appearance of a finished V-groove.
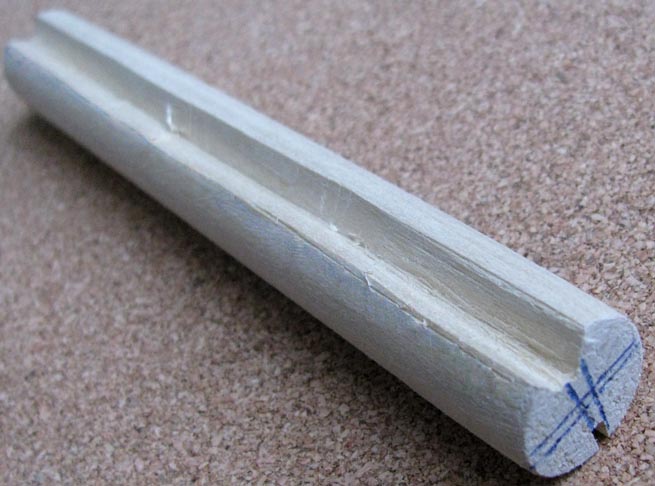
Photo 12 - The finished V-groove.
You will need to periodically check that the groove is not too wide or deep. The wire needs to stand a bit above the groove so that it will bind against the inside of the handle when the plug and hoop assembly is inserted. Widen both grooves until about 1/4 of the diameter of the wire stands above the edge of the groove when viewed from the side. Take the hoop and set one arm in each of the grooves, with the tangs hanging over the ends of the plug, and try to slide the whole thing into the end of the handle. If the tangs touch, file them until they don't touch. If plug and hoop assembly goes in all the way, with moderate to high resistance, the grooves are wide enough. Note that the groove in Photo 12 proved to be to deep, so go slowly and try the fit often. Making the groove wider, rather than deeper, is advised. Since the tangs are hanging over the end of the plug, you can clamp the part of the hoop closest to the handle in a vise and pull on the handle to remove the plug.
Fitting the Hoop to the Plug
You now want to drill a 1/8 inch diameter hole between the two V-grooves, near one end of the plug (see Figure 2). These will receive the two tangs of the hoop. The tangs prevent the hoop wire from being pulled out of the handle and stop it from rotating in the plug. To locate the drilling point for the hole, line the arms of the hoop up with the plug as shown in Figure 2. The ends of the tangs will be resting in the bottom of the grooves at the point where the hole needs to be drilled. To mark the location, lightly tap the wire where it bends at the tang with a hammer. The round depression left in the bottom of the groove is your location to drill. Once the hole is drilled, you can give the an inch or so of the outside end of the plug a light coating of paint with a spray can. Assemble the hoop and plug as shown in Figure 2. The ends of the tangs should not touch when they are fully inserted into the hole. File them to length if they do touch. Now insert the hoop and plug assembly into the end of the handle, leaving about 1/16th of an inch of plug protruding. You should have to use a moderate to high amount of force to do this. Line the hoop wires up with the dimples on the handle shaft. If you decide that you need to remove the plug later, grip the part of the hoop closest to the plug in a vise and pull on the handle.
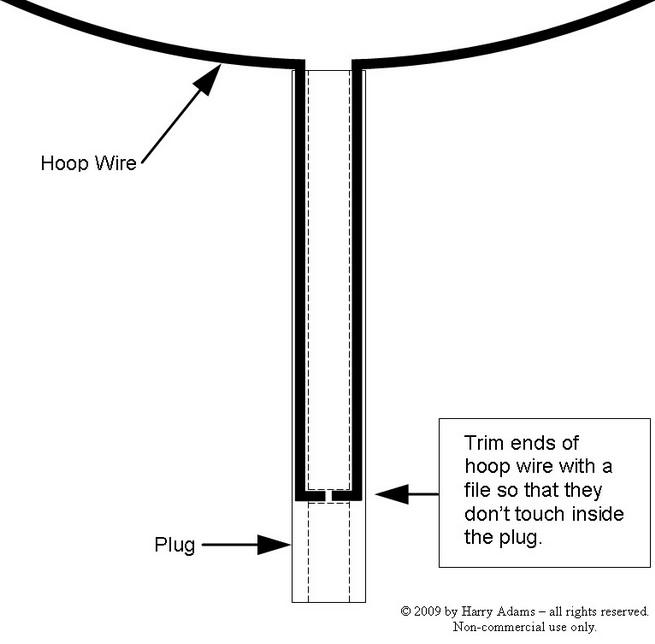
Figure 2 - Hoop and Plug Assembly
You now want to secure the handle to the plug using a wood screw. We use a #4 x 5/8" flat head, brass Robertson wood screw. For our friends south of the border, use a Phillips head. Neither of these have the sharp edges of a slot head, which could snag the net material. Drill a 5 /64th inch diameter hole at the location of the second dimple in from the end of the handle, as shown in Photo 13. Carefully countersink the hole so the head of the screw only protrudes slightly above the surface of the handle. After the netting has been assembled and installed, wrap two layers of plastic electrical tape over the rough edge of the handle next to the plug. This will protect the net material and your fingers from damage. Note that the end of the plug has been painted black at this stage.
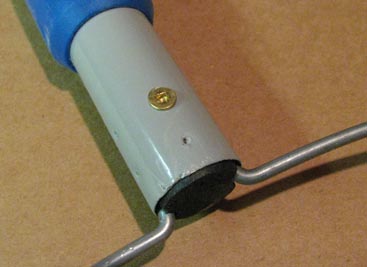
Photo 13 - Securing the handle to the plug.
The Netting
The material used for the net is designer tulle (pronounced "tool") and is available in 60 inch widths at the Walmart™ fabric shop (item # and price not available) but should be available at most fabric outlets. There is more than one type of tulle material and some is fairly stiff and not suitable for nets. The material you want is very soft and very flexible. Photo 14 shows a close-up view of the fabric on a black background. The scale is in inches. Note that the openings in the fabric are hexagonal. Similar fabric with diamond shaped openings is too stiff for a net.
The finished edge of the fabric (solid material at the top) is called a selvage and there is one along the each of the long edges of the fabric as it comes off the bolt. The fabric and selvages do not stretch along the length of the fabric ( horizontally in the photo) but are very stretchy across the width of the fabric (vertically in the photo). This presents some challenges when sewing the fabric.
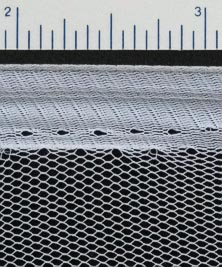
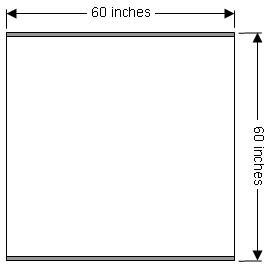
Photo 14 - Netting Figure 3 - Fabric Dimensions
Figure 3 shows the dimensions of the fabric you will use. The selvages are shown in gray. Buy at least 1.5 metres (≈ 60 inches) of fabric to allow for squaring it up and to give you a bit to adjust the thread tension on the sewing machine. When the fabric was cut from the bolt, the edges may not have been cut square to the selvages. These instructions take this into consideration.
Fold the fabric in half along the upper selvage, as shown in Figure 4, allowing it to hang freely. If the fabric was cut square, the left hand edges will line up. If not, you will see something like the diagonal line on the left hand side of the figure. Keeping the selvages aligned, lay the fabric out on a flat surface and smooth out any wrinkles. Now pin the two layers of fabric together with a generous number of straight pins (T's in the figure). Lay out a line 25 inches from the fold in the fabric (dot-dash line) and carefully cut both layers of fabric along the line. Remove the straight pins from the fabric.
Now is a good time to take the excess material you just removed and use it to adjust the thread tension on your sewing machine. If you are having someone else sew the net, give them the excess fabric so that they can do the same. Improper thread tension will result in the stitching being either bunched up or too loose.
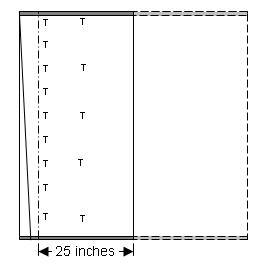
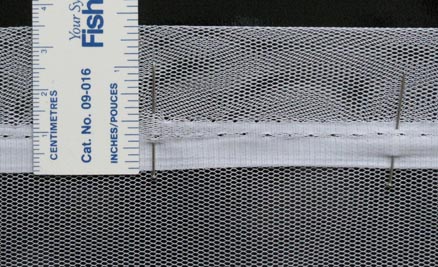
Figure 4 - Folding the Fabric Photo 15 - Pocket Layout
Unfold the fabric and fold the top edge over about 1-3/8 inches, as shown in Photo 15. Pin it in place and edge stitch it together, along the selvage, to form the pocket for the hoop wire (see Photo 16). Next, fold the fabric again so that the hoop pocket is along the top edge, as shown in Figure 5. Smooth out any wrinkles and use lots of straight pins (light gray T's) to fasten both layers together so that all the edges line up.
The bottom of the net can be round, square or tapered. The choice depends on your personal preference. All will be about 36 inches deep, measured from the top of the pocket, as shown in Figure 5. When you have selected the form the net will take, draw it on the fabric using a water soluble ink (a dry erase marker works well). Using more straight pins, pin the two layers of fabric together along the net side of this line and up the left side of the fabric, opposite the fold (on the left in Figure 5). Cut the excess material away (dot-dash line).
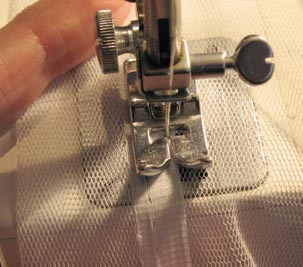
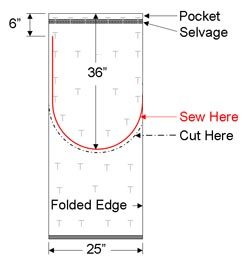
Photo 16 - Sewing the Pocket - The pocket Figure 5 - Shaping the Net
is on the left.
Sew the edges together, about 1/2 inch from the edge of the material (see Photo 17). Sew only to within 6 inches of the hoop pocket (see red line in Figure 5). If you sew any closer, you will not be able to get the net onto the hoop wire. If you are worried about the gap in the net you can stitch it by hand, or by machine, after the net is on the hoop.
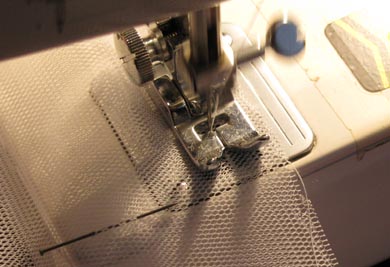
Photo 17 - Sewing the Edge - Note the location of the
straight pin relative to the edge of the fabric.
The netting is now complete. Remove all the pins and turn it inside out.
Assembling the Net
Remove the hoop and plug from the handle. Carefully thread the netting onto the hoop, being careful not to tear the netting. Reinsert the hoop and plug into the handle, with the holes for the wood screw lined up, and insert the wood screw. A couple of wraps of plastic tape around the top of the handle covers up the metal edge, preventing it from cutting your hand or the fabric.
If you are forgetful and apt to put the net down and walk off without it, make a label using a laser printer (waterproof ink) with your contact information and fasten it to the handle with packing tape. Make the packing tape extend past the edges of the label by at least 1/2 inch for a waterproof seal.
Stand back and admire your work and be prepared for "net envy" on the part of your fellow entomologists.
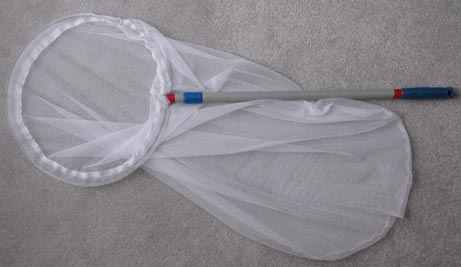
Photo 18 - The Finished Product
Net Technique
Preliminaries
During this section, I will use the following convention regarding the net. The "hoop end" is the part of the netting attached to the hoop and the "closed end" is the part of the netting farthest from the hoop.
As a general rule, stealth is the preferred approach when netting dragonflies but, as with all rules, there a many exceptions. Experiment. What works for one species may be less successful with another.
Basic Technique
The basic technique used with a net is to swing it over the dragonfly until it is well into the net and then turn the handle more than 90°, so that the hoop wire seals the hoop end of the net, preventing escape. Keep the hoop end of the net sealed in this manner until you are ready to remove the dragonfly. Once the dragonfly is trapped in the net, it tries to escape by flying upwards. Nannothemis bella (Elfin Skimmer) is an exception to this rule. To remove the dragonfly from the net you must invert the net, so that the closed end of the net is highest, before rotating the handle to unseal the hoop end. Hold the net handle in your left hand and use your right hand to grab the closed end of the net. Raise the closed end up until the netting is extended by its full length over the sealed hoop end. The dragonfly will fly to the higher, closed end of the net and stay there, ignoring the open hoop end of the net. Rotate the handle to unseal the hoop end of the net and, keeping the net inverted by keeping your right hand raised, insert your left hand into the open hoop end of the net, up to the crook in your left elbow and rest the hoop wire on it. With your right hand, lower the closed end of the net down near your left hand (already in the net). Using both hands, try fold the dragonfly's wings together behind its back and grip them between thumb and index finger with a gentle pressure. Use the folds in the netting to restrict the motion of the dragonfly and manipulate its wings into this position. Now, very gently, pull the dragonfly's feet away from the netting by pulling on the netting with your right hand. This will not be easy. Once you have detached the feet from the netting be careful not to let them get close to it again. Use your right hand to pull the netting away from your left hand as you remove the dragonfly from the net or put your right hand into the net and use it to shield the dragonfly's feet from the net.
I generally keep both hands on the net handle during a swing. Over water, or in high scrub, I hold the very end of the closed end of the net under the index finger of the hand closest to the hoop and release it when I start my swing. This keeps the netting from getting wet or snagged on a twig. An exception to this is the leaping swing, where you time the top of the swing to coincide with a leap into the air. With this technique, you can snag a dragonfly perched, or flying, up to fourteen feet above the ground (varies with the height and agility of the user).
Swing Variations
Dragonflies are encountered in three basic situations: perched, hovering and flying.
Perched Dragonflies
If a dragonfly is perched on the ground, or near the end of a blade of grass or twig, or on an isolated rock, there are two ways of getting it into the net. If it is not too skittish, you may be able to drop the net over it from above by elevating the closed end of the net in one hand and swinging the net down over top of it with the other. Push the net down over the perch as far as possible, to the ground if you can. The dragonfly will fly up into the net and you can proceed as above.
If it is likely to fly off when it detects motion, then you have to attack more quickly. In the case where it is perched near the end of a piece of grass or a twig, swing the net horizontally from behind the dragonfly so that the lower edge of the hoop intersects the perch two or three inches below the dragonfly and follow through. When the dragonfly detects your movement, and takes off into the air, the net will brush the twig aside and be in a good position to capture it. If you manage to surprise it, then the collision of the hoop with the twig will shake the dragonfly loose and into your swinging net.
Hovering Dragonflies
I have found that swinging the net up from underneath the dragonfly is very effective when they are hovering two to three feet above the ground or water. Approach slowly and see if you can get close enough for the swing. If possible, approach from behind.
If you note that a dragonfly repeatedly returns to the same spot and hovers there, try to position yourself inconspicuously while it is away. Set your net close to the ground (or water) near the point where it hovers and wait for it to return. Be patient.
If a dragonfly is hovering very close to the water while laying eggs, then a horizontal swing is the best, preferably from behind. In this situation, however, they are generally so preoccupied that Janet has actually captured them by hand from her kayak.
Flying Dragonflies
Sometimes the darned things just won't land and you must net them in flight. You can swing with, or counter to, the direction of flight and there are arguments for and against both techniques. With the direction of flight minimizes the impact of the net on the specimen and possibly conceals the approach of the net but you have to swing much more rapidly to catch up to it. Counter to the direction of flight still requires a fast swing but gives it a head on view of the approaching net and possibly results in a greater impact when it hits the netting. From either direction, changing the direction of the swing by 90° once the dragon fly is partly in the net helps.
Dragonflies will patrol an area, following a shoreline or a path through the woods, in a circuit. It may take five or ten minutes for them to fly by a particular point again on their route. Be aware of this behaviour and use it to your advantage.
As for other techniques, swinging from underneath requires spilt second timing and the leaping swing requires an agility some of us no longer possess. Try different techniques and see what works.
Dragonflies That Fly Down
As mentioned earlier, most dragonflies fly up into a net when captured. Nannothemis bella (Elfin Skimmer) is a notable exception to this rule. With this species, you need to capture them by swinging the net down over them and then holding it against the ground. Lift one edge of the hoop up a little and insert your hand to make the capture. They are extremely small and delicate. If there is someone in your group with small hands, they should do this. We have not tried holding the net open with the hoop facing up but will update the page if we have a chance to try it.
Back to Table of Contents
©2010 by Harry Adams and Janet Nelson. All rights reserved. This material may not be reproduced, displayed, modified or distributed without the express prior written permission of the copyright holder. Non-commercial use only.